
Arduino ultrasonic projects let you measure distance and respond to it in real time. In this guide, you’ll build a reliable Arduino ultrasonic distance sensor that activates an LED when an object comes within range. You'll get a clear parts list, straightforward wiring instructions, a ready-to-upload sketch in clean code format, plus testing tips, troubleshooting fixes, and ideas for extending the project.
Project Summary
This build uses the popular HC-SR04 (or similar) ultrasonic module to measure distance in centimeters. When an object is closer than a user-defined threshold, a green LED turns on. The system works by sending a pulse, listening for the echo, and calculating distance from the round-trip time. It's perfect for beginners and ideal for applications like robotic obstacle avoidance, parking aids, or automatic door triggers.
Main Goals
- Measure distance using an ultrasonic transducer.
- Light an LED when an object enters a defined range.
- Demonstrate safe, standard wiring practices for sensors.
- Provide a clean, ready-to-use Arduino sketch.
- Cover testing steps, common pitfalls, and practical fixes.
Parts List
All components are common, affordable, and often included in starter kits:
- Arduino Uno (or compatible board)
- HC-SR04 ultrasonic sensor (or equivalent)
- Green LED
- 220Ω resistor
- Breadboard and jumper wires
- USB cable (for power and programming)
- (Optional) Perfboard for a permanent installation
How the Ultrasonic Sensor Works
The HC-SR04 emits a short 40kHz ultrasonic burst from its transmitter. When the sound wave hits an object, it reflects back to the receiver. The Arduino measures how long this echo takes to return using the pulseIn() function.
Distance is calculated using the speed of sound (~340 m/s, or 0.034 cm/µs):
distance (cm) = (echo duration in µs × 0.034) / 2The division by 2 accounts for the round-trip (to the object and back). If this distance is below your threshold, the LED turns on.
Signal Flow Summary
- Arduino sends a 10µs HIGH pulse to the Trig pin.
- Sensor emits ultrasonic burst and sets Echo HIGH.
- Arduino measures how long Echo stays HIGH.
- Distance is computed and compared to the threshold.
- LED responds accordingly.
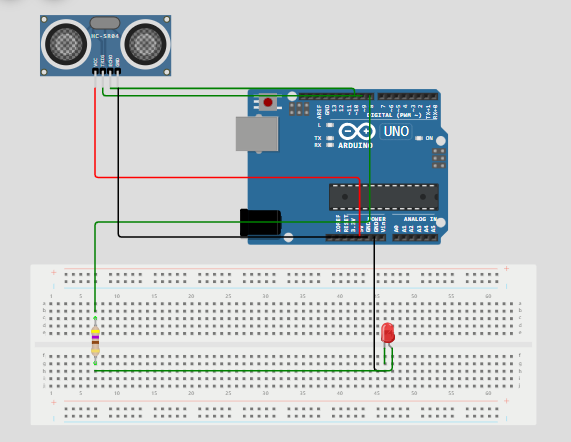
Wiring Guide
Connect components as follows:
- Sensor VCC → Arduino 5V
- Sensor GND → Arduino GND
- Sensor Trig → Arduino Digital Pin 9
- Sensor Echo → Arduino Digital Pin 10
- LED anode (long leg) → Arduino Pin 8 via 220Ω resistor
- LED cathode (short leg) → Arduino GND
Tip: Mount the sensor securely and aim it away from walls or clutter to avoid false echoes. Test indoors first for consistent results.
Pin Map Summary
| Function | Arduino Pin |
|---|---|
| Trigger (output) | D9 |
| Echo (input) | D10 |
| LED control | D8 |
| Power | 5V |
| Ground | GND |
Note: Most HC-SR04 modules are 5V-tolerant. If using a 3.3V sensor, add a logic-level shifter for the Echo line.
Arduino Sketch
// Define pin connections
const int trigPin = 9;
const int echoPin = 10;
const int ledPin = 8;

// Set a distance threshold for detecting movement (in cm)
const int movementThreshold = 50; // Adjust this to your desired distance

void setup() {
  // Initialize pin modes
  pinMode(trigPin, OUTPUT);
  pinMode(echoPin, INPUT);
  pinMode(ledPin, OUTPUT);

  // Start Serial Monitor for debugging
  Serial.begin(9600);
  Serial.println("Starting distance sensor...");
}

void loop() {
  // Trigger the sensor to send out a pulse
  digitalWrite(trigPin, LOW);
  delayMicroseconds(2);
  digitalWrite(trigPin, HIGH);
  delayMicroseconds(10);
  digitalWrite(trigPin, LOW);

  // Measure the duration of the pulse
  long duration = pulseIn(echoPin, HIGH);

  // Calculate distance (in cm)
  int distance = duration * 0.034 / 2;

  // Print distance to Serial Monitor for debugging
  Serial.print("Distance: ");
  Serial.print(distance);
  Serial.println(" cm");

  // Check if an object is within the threshold distance
  if (distance > 0 && distance <= movementThreshold) {
    Serial.println("Object detected within range. Turning LED on.");
    digitalWrite(ledPin, HIGH); // Turn on the LED
  } else {
    Serial.println("No object detected or out of range. Turning LED off.");
    digitalWrite(ledPin, LOW); // Turn off the LED
  }

  // Delay to avoid overwhelming the sensor
  delay(200);
}
Upload and First Run
- Paste the code into the Arduino IDE.
- Select your board (Tools > Board > Arduino Uno) and correct Port.
- Upload the sketch.
- Open the Serial Monitor (9600 baud).
- Watch distance values appear every 200 ms.
- Move your hand (or an object) in front of the sensor—LED should turn on within 50 cm.
Calibration and Threshold Tuning
Adjust movementThreshold to match your use case:
- 20 cm: Close-range detection (e.g., touchless switch)
- 50 cm: General-purpose (robot obstacle avoidance)
- 100 cm: Wide-area monitoring
Simple Calibration Steps
- Place an object at 30 cm from the sensor.
- Observe the printed distance in the Serial Monitor.
- If it reads 33 cm, note the +3 cm offset.
- Optionally, adjust the formula:
int distance = (duration * 0.034 / 2) - offset; - Repeat at different distances to verify consistency.
Testing Checklist
- ✅ Verify Serial Monitor shows changing distance values.
- ✅ Test LED independently with a
blinksketch. - ✅ Confirm sensor wiring matches the pin map.
- ✅ Check that GND is common across all components.
- ✅ Use a multimeter to validate 5V at the sensor.
Common Issues and Fixes
| Issue | Likely Cause | Solution |
|---|---|---|
| Distance = 0 or erratic | Loose wiring or floating Echo | Recheck connections; ensure GND is solid |
| LED always ON | Threshold too high or reflections | Lower movementThreshold; shield sensor from side walls |
| Readings jump/spike | Electrical noise or unstable power | Add a 100µF capacitor near sensor VCC/GND; average 3 readings |
| No echo detection | Trig/Echo pins swapped | Double-check sensor pinout (Trig ≠ Echo!) |
Reduce False Echoes
- Mount the sensor in a cardboard tube to narrow the beam.
- Avoid placing near metal surfaces or corners.
- Keep the sensor perpendicular to expected object paths.
Power Stability
If using motors or servos:
- Power the ultrasonic sensor from a separate 5V regulator.
- Never power high-current devices from the Arduino’s 5V pin.
- Always tie all grounds together at a single point.
Performance Tips
- Reduce
delay(200)to 100 ms for faster response (but not below 50 ms). - For smoother output, average 3–5 readings before acting.
- Minimize
Serial.print()calls in the final version to speed up the loop.
Extend Range
- Use higher-quality transducers (some support >400 cm).
- Ensure a clear line of sight with no obstructions.
- Avoid soft or sound-absorbing targets (e.g., fabric, foam).
Practical Use Cases
- Garage parking aid with LED or buzzer alert
- Robot obstacle avoidance
- Automatic faucet or soap dispenser (with relay)
- Liquid level monitoring in tanks (non-contact)
- Intrusion detection for small enclosures
Project Extensions
- Add an OLED display to show live distance.
- Replace the LED with a buzzer for audible alerts.
- Connect an ESP8266 to send distance data to a phone or cloud dashboard.
- Log readings to an SD card for historical analysis.
- Use multiple sensors (triggered sequentially) for 360° coverage.
- Integrate with a servo to build a DIY radar (see related project below).
Safety & Best Practices
- Ultrasonic sensors are safe—they use sound, not radiation.
- Keep the module dry and dust-free to preserve performance.
- Avoid continuous operation at max range; occasional rest improves longevity.
- Enclose the setup in a protective case if used in dynamic environments.
FAQ
Q: Can I use this on an Arduino Nano?
A: Yes—just ensure pins 8, 9, and 10 are free (or remap in code).
Q: Why inconsistent readings?
A: Check for reflective surfaces, loose wires, or power fluctuations. Try averaging or adding a tube shield.
Q: Does sunlight affect it?
A: No—ultrasonic sensors use sound, not light. Wind or temperature extremes can, though.
Q: Can I use multiple sensors?
A: Yes, but trigger them one at a time with 50+ ms gaps to prevent cross-talk.
Final Checklist Before Deployment
- ✅ Code compiles and uploads without errors
- ✅ LED reacts correctly to object proximity
- ✅ Serial output shows stable, logical distance values
- ✅ Sensor is securely mounted and aimed properly
- ✅ All connections are insulated and strain-relieved
Final Notes
This ultrasonic distance project is a cornerstone of Arduino learning—simple to build, rich in concepts, and endlessly expandable. Start with the basic version, validate it with the Serial Monitor, then enhance it with displays, networking, or mechanical actions. Share your build online to inspire others!
Explore More from Embed Electronics Blog
- Arduino Calculator: Learn how to build your own Arduino calculator using a 16x2 LCD and 4x4 keypad. Perfect for beginners. Full code, wiring, and simulation included.
- Build an Arduino Calculator with LCD & Keypad: Step-by-step guide to creating an Arduino-based calculator with an LCD display and keypad interface.
- 5 Simple Arduino Projects for Beginners: A collection of easy-to-follow Arduino projects to kickstart your electronics journey.
- ESP32 to Proteus: Learn how to simulate ESP32 projects in Proteus for efficient development and testing.
- Smart Parking System with Arduino: Implement a real-time monitoring and automated gate control system using Arduino.
- Top 3 Free Online Microcontroller Simulators: Discover the best free simulators for Arduino and ESP32 to enhance your development process.
- Arduino Multiplexer LED Projects: Explore projects involving multiplexers and LEDs to expand your Arduino skills.
- Arduino Traffic Light System: Build a traffic light system using Arduino to understand timing and control logic.
- Arduino 7 Segment Display: Learn how to use a 7-segment display with Arduino for numerical displays.
- Arduino Interrupts Button LED Project: Implement interrupts in Arduino to control an LED with a button press.
- Fix LM35 Wrong Values: Troubleshoot and fix issues with the LM35 temperature sensor in your projects.
- Fatal Simulation Errors in Proteus 8: Resolve common simulation errors encountered in Proteus 8 when working with Arduino projects.
- Interface EEPROM with Arduino SPI: Learn how to interface an EEPROM with Arduino using the SPI protocol for data storage.
- Arduino Smart Home Parking: Create a smart parking system for your home using Arduino and IoT technologies.
- Arduino Proteus Library: Access a collection of Proteus libraries for Arduino components to enhance your simulations.
- Arduino Blink IoT Guide: A comprehensive guide to getting started with IoT projects using Arduino and Blink.
- DIY Arduino Radar: Build your own radar system using Arduino, ultrasonic sensors, and servo motors for object detection.


0 Comments